
 Screens and monitors
The text terminal, the pixel drawing under it, monitors, clicks and Display Links: everything a computer shows.
A computer shows things in three ways:
- its terminal, the screen you open with a right-click: a grid of characters, with a layer of pixels under it;
- monitors, blocks that show that same terminal in the world, as big as a wall, and that players can press;
- Display Links of Create, which copy lines of text chosen by the program to Display Boards, Nixie Tubes and signs.
This page explains each one, how players click on them, and how to lay out a screen that stays readable and fast.
The terminal
The terminal is a grid of characters. Its size and its look depend on the computer:
| Computer | Text grid | Look | Pixels for gfx | Clicks in the terminal |
|---|---|---|---|---|
| Tube Computer | 40 × 14 | dark ink on teletype paper | none | no |
| Transistor Mainframe | 51 × 19 | green phosphor | 306 × 171 | yes |
| Minicomputer | 51 × 19 | amber phosphor | 306 × 171 | yes |
| Personal Computer | 51 × 19 | 16 colours | 306 × 171 | yes |
| Microcontroller | 40 × 12 | 16 colours | 240 × 108 | yes |
| Modern Computer | 64 × 24 | 16 colours | 384 × 216 | yes |
A program can ask for the size with term.get_size, which returns {w = columns, h = rows}. Use it instead of fixed numbers and the same program fits every computer.
Writing text
There are two ways to put text on the screen, and the difference matters for layouts:
printandwritewrite like a typewriter: at the end of a row they wrap to the next one, a tab jumps to the next multiple of 4 columns, and at the bottom of the screen everything scrolls up.printends with a new line,writedoes not. This is right for logs and messages.term.writewrites at the cursor and never wraps or scrolls: what goes past the right edge is dropped, and a\nbecomes a space. This is right for fixed layouts: a dashboard, a menu, a button.
The cursor is where the next character goes. term.set_cursor(x, y) moves it, with (1, 1) in the top left corner, and term.get_cursor reads it back.
term.clear()
term.set_cursor(1, 1)
print("Stock report")
term.set_cursor(20, 3)
term.write("iron: 1450")
term.set_cursor(20, 4)
term.write("copper: 820")
term.set_cursor(1, 6)Stock report
iron: 1450
copper: 820To clear, term.clear empties the whole grid and term.clear_line the row of the cursor. Neither moves the cursor: follow term.clear() with term.set_cursor(1, 1). term.scroll(n) moves all the text up by n rows (down when n is negative). All three fill the cleared cells with the current background colour.
Colours
term.set_fg sets the colour of the next characters, term.set_bg the colour of the cells behind them. Both take a number from 0 to 15: write term.colors.red (14) rather than the number itself. The 16 colours and their numbers are in Colours.
A colour applies to what is written after it, until it changes again. term.clear paints every cell with the current background, so term.set_bg(term.colors.blue) followed by term.clear() turns the whole screen blue.
term.set_bg(term.colors.black)
term.clear()
term.set_cursor(2, 2)
term.set_fg(term.colors.yellow)
write("Boiler ")
term.set_fg(term.colors.lime)
print("running")
term.set_cursor(2, 3)
term.set_fg(term.colors.yellow)
write("Water  ")
term.set_bg(term.colors.red)
term.set_fg(term.colors.white)
print(" EMPTY ")
term.set_bg(term.colors.black)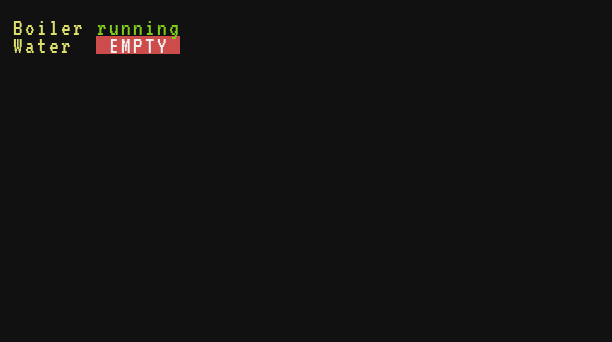
The look of each computer
The same program looks different on each age of computer. This small dashboard uses a coloured title bar, coloured values, a red warning and a bar drawn with gfx:
local function row(y, label, value, color)
  term.set_cursor(2, y)
  term.set_fg(term.colors.light_gray)
  term.write(label)
  term.set_cursor(17, y)
  term.set_fg(color)
  term.write(value)
end

term.set_bg(term.colors.black)
term.clear()
term.set_cursor(1, 1)
term.set_bg(term.colors.blue)
term.clear_line()
term.set_fg(term.colors.white)
term.write(" FURNACE ROOM")
term.set_bg(term.colors.black)
row(3, "Coal", "640", term.colors.lime)
row(4, "Iron ore", "96", term.colors.yellow)
row(5, "Iron ingots", "1450", term.colors.white)
term.set_cursor(2, 7)
term.set_bg(term.colors.red)
term.set_fg(term.colors.white)
term.write(" FUEL LOW ")
term.set_bg(term.colors.black)
term.set_cursor(2, 9)
term.write("Fuel")
gfx.rect(43, 74, 182, 11, "white")
gfx.rect(45, 76, 40, 7, "orange", true)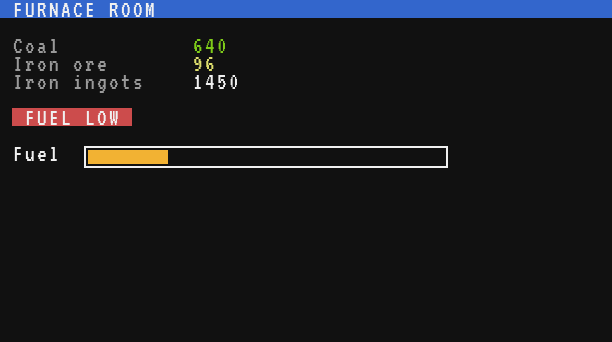
On the green screen of a Transistor Mainframe:
local function row(y, label, value, color)
  term.set_cursor(2, y)
  term.set_fg(term.colors.light_gray)
  term.write(label)
  term.set_cursor(17, y)
  term.set_fg(color)
  term.write(value)
end

term.set_bg(term.colors.black)
term.clear()
term.set_cursor(1, 1)
term.set_bg(term.colors.blue)
term.clear_line()
term.set_fg(term.colors.white)
term.write(" FURNACE ROOM")
term.set_bg(term.colors.black)
row(3, "Coal", "640", term.colors.lime)
row(4, "Iron ore", "96", term.colors.yellow)
row(5, "Iron ingots", "1450", term.colors.white)
term.set_cursor(2, 7)
term.set_bg(term.colors.red)
term.set_fg(term.colors.white)
term.write(" FUEL LOW ")
term.set_bg(term.colors.black)
term.set_cursor(2, 9)
term.write("Fuel")
gfx.rect(43, 74, 182, 11, "white")
gfx.rect(45, 76, 40, 7, "orange", true)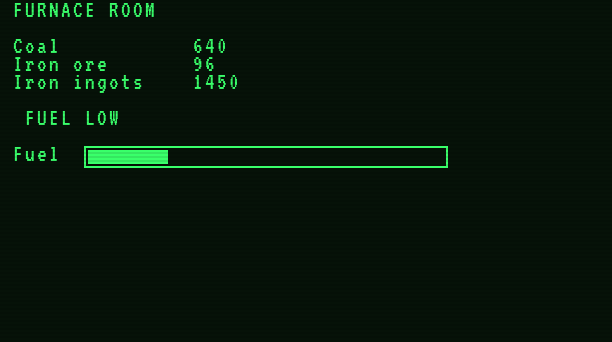
And on the amber screen of a Minicomputer:
local function row(y, label, value, color)
  term.set_cursor(2, y)
  term.set_fg(term.colors.light_gray)
  term.write(label)
  term.set_cursor(17, y)
  term.set_fg(color)
  term.write(value)
end

term.set_bg(term.colors.black)
term.clear()
term.set_cursor(1, 1)
term.set_bg(term.colors.blue)
term.clear_line()
term.set_fg(term.colors.white)
term.write(" FURNACE ROOM")
term.set_bg(term.colors.black)
row(3, "Coal", "640", term.colors.lime)
row(4, "Iron ore", "96", term.colors.yellow)
row(5, "Iron ingots", "1450", term.colors.white)
term.set_cursor(2, 7)
term.set_bg(term.colors.red)
term.set_fg(term.colors.white)
term.write(" FUEL LOW ")
term.set_bg(term.colors.black)
term.set_cursor(2, 9)
term.write("Fuel")
gfx.rect(43, 74, 182, 11, "white")
gfx.rect(45, 76, 40, 7, "orange", true)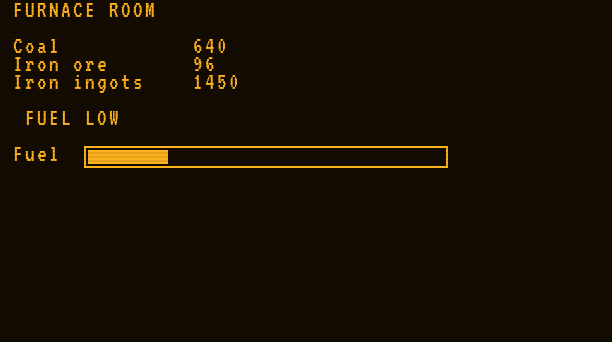
On the two phosphor screens, the colours of the text and of the cells are ignored: every character glows in the phosphor colour on a dark screen, so the title bar and the red warning lose their background. The drawing of gfx still shows, because every colour except black lights up there. A program for these computers highlights with words and signs (>, [ ], !) or with lines drawn by gfx, never with a background colour alone. A lit gfx area behind text would hide it: the characters glow in the same colour.
The Tube Computer prints on paper: dark ink on a cream roll, no colours, no gfx, and its paper cannot be clicked.
> stock
Iron ingots: 1450
Copper ingots: 820
Coal: 640
The Microcontroller has the smallest colour screen (40 × 12), the Modern Computer the largest (64 × 24). A program that reads term.get_size() and gfx.size() adapts to both.
Drawing under the text
Under the characters lies a layer of pixels, 6 × 9 per character cell, that the gfx library draws on: lines, shapes, pixel text and sprites. The screen shows three layers, from bottom to top: the background colour of the cells, the drawing, then the characters. Text always stays readable over a drawing, but a cell's background colour is hidden where something is drawn.
Character cell (col, row) covers the pixels from (col - 1) * 6 + 1 to col * 6 across and from (row - 1) * 9 + 1 to row * 9 down. With that, a drawing lines up exactly with the text: a frame around a group of cells, a bar under a label.
local function box(col, row, cols, rows, color)
  gfx.rect((col - 1) * 6 + 1, (row - 1) * 9 + 1, cols * 6, rows * 9, color)
end

term.set_bg(term.colors.black)
term.clear()
gfx.clear()
box(2, 2, 26, 6, "light_gray")
term.set_cursor(4, 3)
term.write("Boiler 1")
term.set_cursor(4, 5)
term.write("Water")
local level = 0.8
box(12, 5, 14, 1, "gray")                          -- the frame of the gauge: 14 cells of row 5
gfx.rect(68, 38, math.floor(82 * level), 7, "blue", true)
term.set_cursor(13, 5)
term.write(math.round(level * 100) .. "%")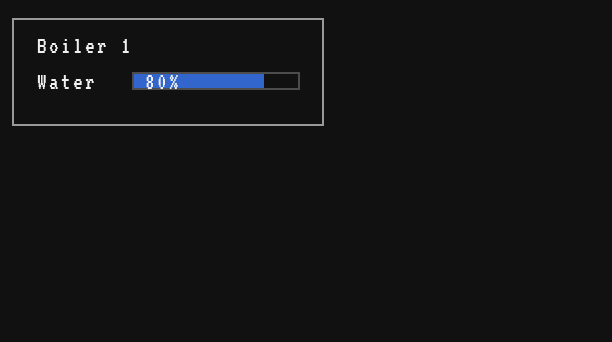
The drawing is kept when the program ends and is not touched by term.clear: clear it with gfx.clear(). Everything about drawing is on the gfx page.
Monitors
A monitor shows the terminal of a computer in the world, readable by everyone around (up to 64 blocks away). There are two: the CRT Monitor (Transistor age, thick bezel) and the LCD Monitor (Digital age, thin bezel). See Monitors for the block itself.
Building a screen
- Place the monitor so that it touches the computer, on any side of the monitor except its screen. One monitor of a wall touching the computer is enough.
- Monitors of the same type (all CRT or all LCD), side by side, facing the same way, merge into one screen. The group must be a full rectangle, up to 8 wide and 6 tall. A group that is not a full rectangle, or that is too big, does not merge: each monitor then works alone.
- A monitor wall should touch only one computer.
The screen does not get more characters when it grows: the terminal of the computer (51 × 19 on a Personal Computer) is scaled to fit the wall and centred, keeping its proportions. A wall of other proportions leaves dark bands on the sides or at the top and bottom. Screens of 51 × 19 and 64 × 24 characters are close to 16 by 9: walls of 5 × 3 or 7 × 4 monitors fit them well. The Microcontroller's screen is wider: 2 × 1 or 4 × 2.
A program can read the size of the wall, in blocks, with monitor.size() (the monitor is a device of the computer it touches).
The monitor goes dark while the computer has no rotation or is overstressed, and shows an empty screen while it is switched off. Updates go to every player near the computer, and only the rows of pixels that changed travel (see gfx).
CRT or LCD
| CRT Monitor | LCD Monitor | |
|---|---|---|
| Bezel | thick (1/8 of a block) | thin (1/16 of a block) |
| Look | the look of the computer: green, amber or colours | always the 16 colours |
| Tube Computer | its paper shows as green phosphor | colours |
An LCD Monitor shows the colours the program chose even on a Transistor Mainframe or a Minicomputer, whose own screen ignores them. The colours are always kept by the computer; only the screen decides whether to show them.
Opening the terminal, pressing the screen
A right-click on any monitor of a wall opens the terminal of its computer, as if you had clicked the computer.
When the running program waits for clicks, a right-click on the screen presses it instead: the program receives a click event, exactly like a click in the terminal (a light pen on the CRT, a touch screen on the LCD). A program waits for clicks once it has called os.pull_event("click") or os.pull_event() (any event), and until it ends. A press on the bezel or on the dark bands around the picture does nothing.
To open the terminal of a program that waits for clicks, sneak and right-click: sneaking always opens the terminal.
Clicks and drags
The click event
A click in the terminal, or a press on a monitor, sends the click event to the program:
| Field | Value |
|---|---|
e.name | "click" |
e.x, e.y | the character cell clicked, (1, 1) in the top left corner |
e.px, e.py | the pixel clicked, for buttons drawn with gfx, (1, 1) in the top left corner |
e.button | 1 for the left button, 2 for the right one, 3 for the middle one; always 1 on a monitor |
e.source | "terminal" or "monitor" |
while true do
  local e = os.pull_event("click")
  print(e.source .. " cell " .. e.x .. "," .. e.y .. " pixel " .. e.px .. "," .. e.py)
end
Use e.x and e.y for buttons made of text, e.px and e.py for buttons drawn in pixels. Both are always given.
Which screens can be clicked
| Where | Who can click |
|---|---|
| The terminal of a Transistor Mainframe, Minicomputer, Personal Computer, Microcontroller or Modern Computer | any player who has it open, with any button |
| The terminal of the Tube Computer | nobody: its paper cannot be clicked |
| A monitor (CRT or LCD), on any computer, the Tube Computer included | any player, with a right-click on the screen, while the program waits for clicks |
Drags
In the terminal, moving the mouse while holding a button down sends drag events, with the same fields as click. The drag starts with a click on the picture and follows the button that was pressed. There is at most one drag per tick, and only when the mouse reaches a new pixel. Monitors only send clicks, never drags.
A drag rarely arrives on every pixel: join the points with a line, as the paint example does:
local lastX, lastY = 0, 0
while true do
  local e = os.pull_event()
  if e.name == "click" then
    gfx.pixel(e.px, e.py, "white", 3)
    lastX, lastY = e.px, e.py
  elseif e.name == "drag" then
    gfx.line(lastX, lastY, e.px, e.py, "white", 3)   -- no gaps when the mouse moves fast
    lastX, lastY = e.px, e.py
  end
end
The events, their order and the other ones (keys, timers, redstone) are listed in Events.
Display Links
Create's Display Link reads a source block and writes text on a target: a Display Board, a Nixie Tube, a sign. A computer can be the source. The program chooses the lines with the display library:
display.set({"Iron: 1450", "Copper: 820"})   -- every line at once
display.line(3, "Furnaces: 4 running")         -- one line
This is the third way to show text, and often the best for players far away: a train station board, a stock counter above a vault, a big Nixie Tube clock. It works on every computer, the Tube Computer included, and needs no monitor. The lines (16 at most, 128 characters each) stay after the program ends, until the computer reboots or shuts down. The Display Link reads them again by itself every half second.
Laying out a screen
Title bars and fixed fields
A dashboard keeps everything in place: a title bar on the first row, a label in a fixed column, its value in another. Write with term.write so that nothing wraps or scrolls, and pad the values to a fixed width with string.format, so that a shorter value erases the end of a longer one: string.format("%6d", 82) is " 82", and "%-10s" pads text on the right.
Menus
A list where one entry is highlighted, moved with the arrow keys and chosen with Enter, or chosen directly with a click on its row. os.pull_event() with no name receives both the keys and the clicks:
local recipes = {"Iron ingots", "Copper ingots", "Brass ingots", "Andesite alloy", "Precision mechanisms"}
local selected = 2
local TOP = 4

local function drawMenu()
  for i, name in ipairs(recipes) do
    term.set_cursor(3, TOP + i - 1)
    if i == selected then
      term.set_bg(term.colors.yellow)
      term.set_fg(term.colors.black)
    else
      term.set_bg(term.colors.black)
      term.set_fg(term.colors.white)
    end
    term.write(string.format(" %-24s", name))
  end
  term.set_bg(term.colors.black)
  term.set_fg(term.colors.white)
end

local w = term.get_size().w
term.set_bg(term.colors.black)
term.clear()
term.set_cursor(1, 1)
term.set_bg(term.colors.blue)
term.clear_line()
term.write(" CRAFTING ORDERS")
term.set_bg(term.colors.black)
term.set_cursor(3, TOP + #recipes + 1)
term.set_fg(term.colors.light_gray)
term.write("Up/Down and Enter, or click a line")
drawMenu()

while true do
  local e = os.pull_event()
  if e.name == "key" and e.key == "up" and selected > 1 then
    selected = selected - 1
    drawMenu()
  elseif e.name == "key" and e.key == "down" and selected < #recipes then
    selected = selected + 1
    drawMenu()
  elseif e.name == "click" and e.y >= TOP and e.y < TOP + #recipes then
    selected = e.y - TOP + 1
    drawMenu()
  elseif e.name == "key" and e.key == "enter" then
    term.set_cursor(3, TOP + #recipes + 3)
    term.clear_line()
    term.write("Ordered: " .. recipes[selected])
  end
end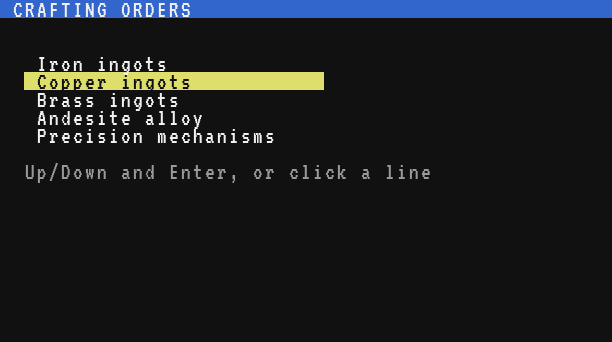
On a monochrome screen, the yellow bar would not show: mark the selected line with a sign such as > instead.
Buttons
Buttons made of text are coloured blocks of cells. Make them three rows tall and wide: on a monitor, players press them with the crosshair from a distance. The click is inside when e.x and e.y fall in the block:
local buttons = {
  {x = 3, y = 4, label = "Lamps", side = "top", on = true},
  {x = 3, y = 8, label = "Gate", side = "left", on = false},
  {x = 3, y = 12, label = "Conveyor", side = "back", on = false},
}
local WIDTH, HEIGHT = 24, 3

local function draw(b)
  local state = "OFF"
  if b.on then
    term.set_bg(term.colors.green)
    state = "ON"
  else
    term.set_bg(term.colors.red)
  end
  term.set_fg(term.colors.white)
  for dy = 0, HEIGHT - 1 do
    term.set_cursor(b.x, b.y + dy)
    term.write(string.rep(" ", WIDTH))
  end
  term.set_cursor(b.x + 2, b.y + 1)
  term.write(string.format("%-16s%4s", b.label, state))
  term.set_bg(term.colors.black)
end

local function hit(b, x, y)
  return x >= b.x and x < b.x + WIDTH and y >= b.y and y < b.y + HEIGHT
end

term.set_bg(term.colors.black)
term.clear()
term.set_cursor(3, 2)
term.write("WORKSHOP PANEL")
for _, b in ipairs(buttons) do
  draw(b)
end
while true do
  local e = os.pull_event("click")
  for _, b in ipairs(buttons) do
    if hit(b, e.x, e.y) then
      b.on = not b.on
      rs.set(b.side, b.on)
      draw(b)
    end
  end
end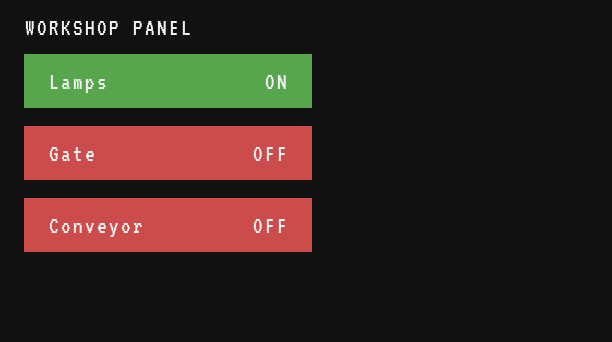
The same test with e.px and e.py works for buttons drawn in pixels: see the patterns of gfx.
Redraw only what changes
Clearing the whole screen and drawing it again at every update makes it flicker, costs instructions, and sends the whole picture to every player. Draw the fixed parts once, keep the values you have shown, and write a value only when it changed:
local fields = {
  {label = "Iron ingots", y = 3},
  {label = "Copper ingots", y = 4},
  {label = "Coal", y = 5},
}
local shown = {}

local function show(i, value)
  if shown[i] == value then
    return
  end
  shown[i] = value
  term.set_cursor(18, fields[i].y)
  term.write(string.format("%6d", value))
end

term.set_bg(term.colors.black)
term.clear()
term.set_cursor(2, 1)
term.write("VAULT")
for _, f in ipairs(fields) do
  term.set_cursor(2, f.y)
  term.write(f.label)
end
-- sample readings; in a world, read them from the vault every few seconds
local readings = {{1450, 820, 640}, {1452, 820, 630}, {1460, 818, 82}}
for _, r in ipairs(readings) do
  for i = 1, #fields do
    show(i, r[i])
  end
  sleep(1)
end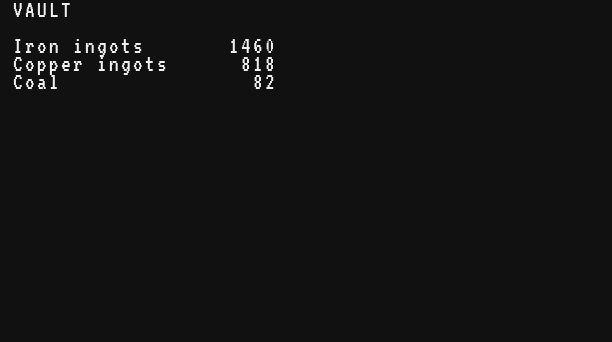
Here only the values that moved are written again, and the %6d padding wipes the old digits when 630 becomes 82.
See also
term: every function of the text screen.gfx: drawing in pixels, with complete patterns (charts, gauges, animations, pixel buttons).display: lines for Display Links.Monitors: the monitor block and itssizemethod.Events:click,drag,keyand every other event.Colours: the 16 colours, their numbers and their hex digits.